How Do I Make my AutoText Entries Created in Microsoft Word 2016 Available in Microsoft Outlook 2016?
The AutoText feature in Word 2016 (and older versions) can make typing long or complex words much simpler. For instance, let’s say you are writing a paper on the psychological effects of war on soldiers. Imagine having the type the word “psychological” over and over again. It’s one of those words that you have to think about to spell correctly.
Instead, let’s go over to the AutoText feature in Word and create a shortcut for the word “psychological”.
Below are the step-by-step instructions. It’s important to understand how to use this first before learning how to transfer those AutoText entries to Microsoft Outlook 2016.
- Highlight the word “psychological” in your document.
- Click the Insert button located on the ribbon.
- Go over to “Quick Parts” located toward the far right and click on that.
- A drop-down list opens. AutoText is the first option. Hover over AutoText and three new options will open.
- Click on the first option, “Save selection to AutoText Gallery”.
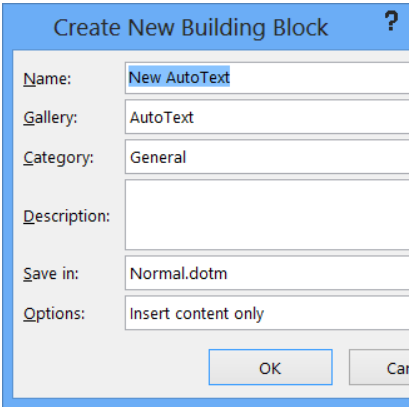
- A new box called “Create New Building Block” opens. In this box, you are giving this particular entry a name you can remember.
- The 2nd line in this box asks what gallery you want to save to. “AutoText” is the default, so leave that.
- The next line asks about the category. Use the “General” category.
- Adding a description is optional. You can leave this blank.
- The next line says “Save in” and this question relates to where you want to save the abbreviation. There are two choices: Normal.dotm and Building Blocks.docx. In older versions of Word, these AutoText abbreviations were saved in Normal.dotm, so click on that.
- The last line is called “Options”. This one gives you the option of inserting the content in different locations. “Insert Content Only” will simply insert the entry wherever you are typing in the document. The second option inserts the word in a new paragraph and the third one inserts the word on a new page. In most cases, you will want to select the first option.

Now, each time you want to type the word “psychological”, all you do is start typing the word and AutoText will fill the rest of the word in for you. The word automatically appears in the document. You can add an unlimited number of AutoText entries. You could create one for words or even phrases that you commonly use, such as “Thank You”.
How is AutoText Different from AutoCorrect?
Even older versions of Microsoft Word have a handy feature called “AutoCorrect”. There are already many words in this list. All the commonly misspelled words such as “received” are in there by default. If you type the word “received” and misspell it, AutoCorrect will automatically fix it for you. You can test this out by misspelling words like:
- Misspelling
- Automatically
- Receive
- Tennessee
Occasionally, you may run into a word that is not on the list. Or you may type a word like “occasionally” wrong most of the time. Many users do that. The word has two “c’s” and one “s”. AutoCorrect can fix it for you, but the default list only contains the word “occasion”. So let’s add “occasionally” to the list so that it is always corrected as well.
In Word 2010 and above, “Word Options” is found by going to File>Options>. Now click on “Proofing” found on the left side of the screen. If using Word 2007 and below, click on the Word Icon in the upper left-hand corner, then scroll down to “Word Options”, which is located next to “Exit Word”.
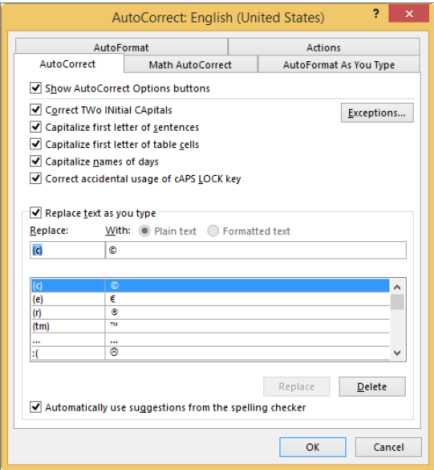
Once you get to the Proofing screen, click on “AutoCorrect Options”. Now you’ll see a list of commonly misspelled words on the left and their correct spelling on the right. Many different words and symbols are added to Word by default but it’s easy to add your own words to the list.
In the line named “Replace”, type in the misspelled version of the word. For this exercise, we are adding an autocorrect entry for the word, “occasionally”. The “Replace” line is where you want to type the incorrect version of the word: “occassionally”. Now type the correct spelling of the word in the “With” box: “occasionally”. Now each time you type the word wrong, it will automatically correct itself. This is a real time saver for those who type a lot and sometimes misspell the same words over and over.
The AutoText feature works very similar to AutoCorrect. One of the best features of AutoCorrect is that it works across all Microsoft Office programs. This means that if you add or delete a word in Word, the word is added or deleted in other office programs like Excel or PowerPoint.
How to Use AutoText in Microsoft Outlook 2016
 Microsoft Outlook 2016 allows you to create pre-defined content that you can add to emails that you often send out. This is a great time-saver and it prevents errors. So let’s create an AutoText entry for the words, “Greetings to all my faithful fans.”
The simplest method (and there are several) is to open a new email in Outlook and type the words at the top of the page. Then highlight them and press Alt + F3. This opens a window called “Create New Building Block”. The default entries in this box are usually okay to use. The only thing to fill out is the first line, which is the name of the new entry. You could use the name “Greetings” or anything that tells you what the text is all about.
So enter the name “Greetings” in the first line, then choose “OK” to close the window. Now, when you go back to the email, start typing the word “Greetings” and the AutoText content will show up. Press “Enter” to insert the text (after making sure this is the correct AutoText you want to use.) This line of text is automatically filled in for you. You can press enter to get to the body of your email and continue creating your email.
Tip: If you’ve been using an older version of Word and would like to update your Normal.dotm files, simply open the newest version of Word. Next, open the Normal.dotm files and then “Save As”, using the newer Word format.
How to Find Your Normal.dotm Templates
The most common pathway to these files is:
C:UsersYour User NameAppDataRoamingMicrosoftTemplates
You can also type this into your Start menu: %appdata%MicrosoftTemplates
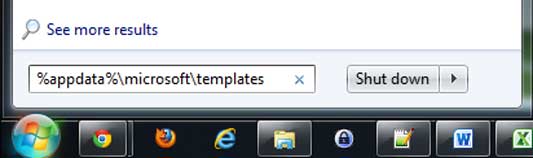
This opens the Templates folder in Windows Explorer. If you were to delete the Normal.dotm file altogether, then the original version of the file would be automatically recreated the next time you open Word. This would be the default version that does not contain all your additions and changes. You can also rename a customized version as Normal.dotm and Word will use that version as your default template the next time you open Word.
If you cannot locate the files, then follow these instructions:
Open Word, then go to File>Options>Advanced>File Locations>User Templates. You should be able to see the Normal.dotm files located there. Click on one to highlight the path to it in the browser bar and make a note of the pathway. Now close Word and restart it. Click on “Open” as you would to open a document. Follow the pathway to the Normal.dotm templates.
Working with Normal.dotm Files
Most Word users have AutoText entries in older versions of Word that they would like to move to their current version of Word 2016. Older versions of Word used the Normal.dotm format, so this makes it easier to move them to the new version of Word. Please note that Normal.dotm files cannot be updated or modified while Word is running.
First, find the template files as described above. Word usually keeps copies of older Normal files. For Word, these files are named NormalPre. For Microsoft Outlook, these files are named NormalEmailPre.
Next, make a backup copy of your Word Normal.dotm templates file. Now open Microsoft Outlook. Navigate to the templates directory. Paste the Normal.dotm file into that directory. Close Outlook and then when you reopen it, the Normal.dotm templates file should appear in the files.
Your AutoText entries created in Word 2016 should now be available in Microsoft Outlook 2016.